

How To Design Android Apps In Eclipse

Hey there
Planning to develop a mobile application?
You must be wondering which is the best platform to target and the most obvious answer to this is Android.
In this blog, I will guide you with the important details associated with Android development along with a detailed step by step guide to Android development with Eclipse IDE.
Meanwhile, if you are seeking out the best Hire android app developer to create your next application, contact a mobile app development company straightaway.
A Brief Introduction to Android
Android is an open-source platform created on Linux and has become the first choice of one and all willing to create a mobile application.
Android is typically seen as a mobile operating system, however, it is no more restricted to mobile. The platform is used in many other devices nowadays including televisions and mobiles.
The Android platform can be used to run a variety of applications including entertainment, communication, social, media, travel, and so on.
Now, let's understand the most important benefits offered by Android application development.
6 Prominent Benefits of Android Development

- Lesser Development Cost
Android is a completely free and open-source platform where you only need to pay for the development process. Hence, you can come up with a great application without investing large sums of money. - Adaptable User Interface
An appealing and user-friendly UI is vital to assure the success of a mobile application. The use of Android for application development enables you to develop convenient and comprehensible user interfaces for your mobile applications. - Popularity
Android is the most popular and widely used platform utilized by more than 80% of mobile devices across the world. Hence, investing in Android application development can reward you with a vast number of application users. - Security
The security of an application is always the topmost concern no matter you are creating a web or a mobile application. With Android application development, you can assure a secure and smooth operation of your mobile application. - Easy to Start
Android development is based on Java which is one of the most popular and widely used languages across the world. Hence, anyone having sound knowledge of Java programming can learn and start Android development easily.
Android development is based on Java which is one of the most popular and widely used languages across the world. Hence, anyone having sound knowledge of Java programming can learn and start Android development easily. - Fast Time to Market
Today's market is full of competition where a quick and easy deployment of the application has become a primary need and the delays caused in the same may introduce big losses to the business. With Android development, you can develop and deploy your application quickly and flawlessly.
So, guys, I hope you understood the benefits of Android application development very well and are convinced to adopt it.

Now, the next thing about which you need to think is the IDE. If you are not aware of what an IDE is, let me explain the term for you in brief.
"IDE or Integrated Development Environment is a software comprising an editor, compiler, required tools, and a debugger. The primary objective of any IDE is to make the application development fast and easy."
Here is the question that arises :
Which IDE (Integrated Development Environment) to choose for the development?
Although many options including Android Studio etc. are available, one of the most recommended and widely used IDE to accomplish Android application development is Eclipse.
Let's have a look at what is it and what benefits it offers. An Introduction to Eclipse
"Eclipse is a popular IDE that permits the development of applications using a variety of programming languages including Java, C, C++, Python, Ruby, and so on."
The Primary Benefits of Using Eclipse IDE Include
- Simple layout
- Enhanced project management
- Lessen boot-up time
- GIT integration
- Accelerated application development
- Easy debugging and likewise
Guys, I hope you are clear with all the information given above and we are all set to commence the main topic of this blog i.e. step-by-step guide to Android development with Eclipse. We will start shortly but before that let's understand a few important terminologies first
Key Terminologies of Android App Development

- SDK
An SDK or Software Development Kit is a collection of tools and libraries required to develop the underlying application. - ADT
ADT or Android Development Tools is a plugin to expand the Eclipse IDE. The plugin avails the developers with an enhanced set of tools required to accomplish Android application development successfully. - AVD
AVD or Android Virtual Device is an emulator that aids to understand the behavior of the application on the actual Android device. - JDK
JDK or Java Development Kit is utilized to code the underlying Android application.
Building Blocks of Android
Below is a brief look at the essential building blocks of Android
- Activity – A class exemplifying an individual screen.
- Intents – Utilized to call components.
- Services – A background process capable of running for a prolonged time.
- Content Providers – Allow data sharing between the applications.
- Fragments – These are the partitions of an activity.
- AndroidManifest.XML – Holds the information about activities, content providers, and likewise.
A Step-by-Step Guide to Commence Android Development with Eclipse

- Setting up the development environment
The very first thing you need to do while creating an application is setting up the development environment.
To proceed with Android application development using Eclipse, you are required to download and set up the following mentioned tools. Make sure you have Windows XP or later, or MAC OS 10.5.8 or later before you proceed
- Java JDK5 or JDK6
- Android SDK
- Eclipse IDE
- Android Development Tools Eclipse Plugin (optional)
- JDK Setup and Installation
Download JDK using this link <https://www.oracle.com/java/technologies/javase-downloads.html> and install it on your device.
Now, set up the PATH and JAVA_HOME variables. This path will be directed to the folder where your java and javac resides.
Suppose you are working on windows and installed JDK in C:\jdk 1.6.0_15.
You are required to include the given lines in the C:\autoexec.bat file.
set PATH=C:\jdk1.6.0_15\bin;%PATH%
set JAVA_HOME=C:\jdk1.6.0_15
- Installing and Configuring Android SDK
Download and install Android SDK using this link <https://developer.android.com/studio>.
Let's configure it now.
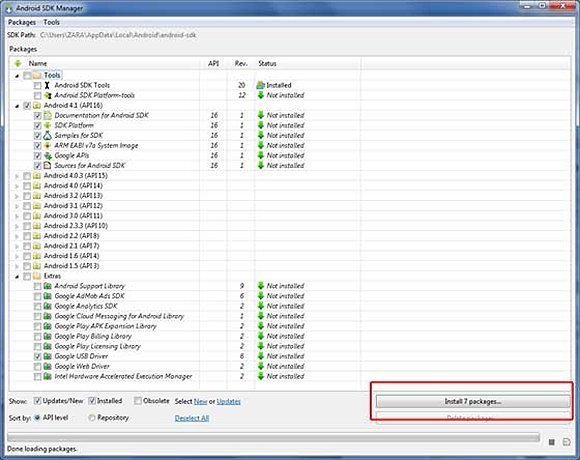
You must be seeing the above window after a successful installation.
Deselect the given two options as it will help you to diminish the installation time
- Documentation for Android SDK
- Samples for SDK
Now click on 'Install 7 Packages'. A dialog box given in the below screenshot will appear
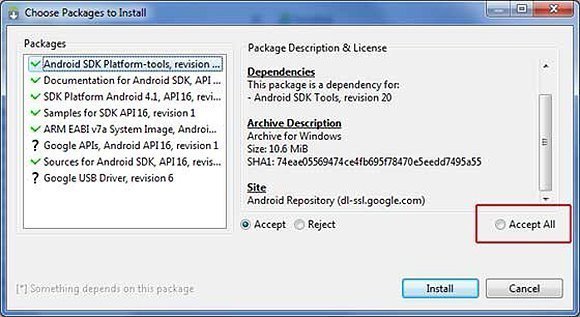
Finish the installation and shut the SDK manager.
- Installing and Setting Eclipse IDE
Now, download and install the Eclipse IDE. Your system will show a window like below after successful installation

- Setting up the ADT plugin
Next comes the installation of the ADT plugin.
Open Eclipse and Navigate to Help > Software Updates > Install New Software.
A dialog box will appear as shown below
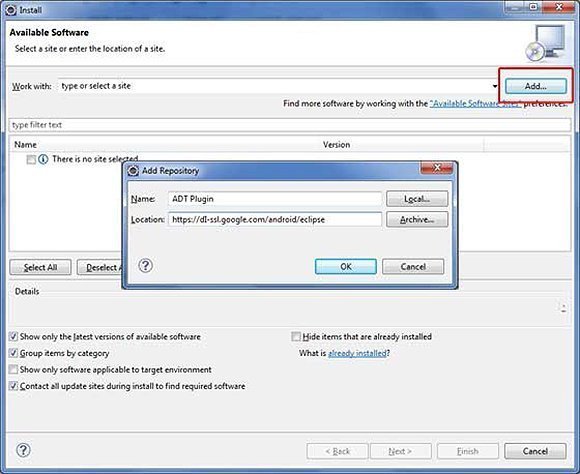
Click 'Add'
Give https://dl-ssl.google.com/android/eclipse/ in the location field and click 'Ok'.
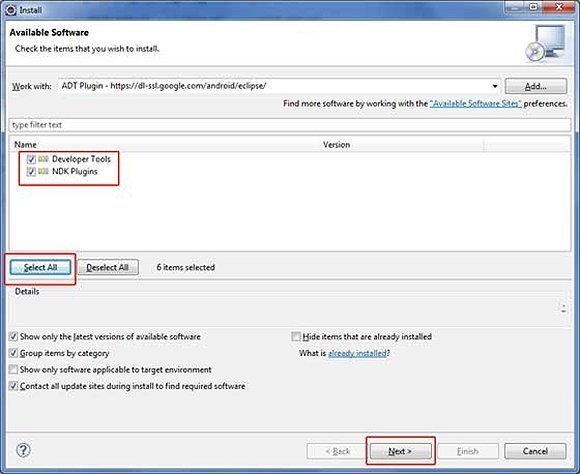
By doing this, Eclipse will find out and show the list of discovered plugins. Select All and click Next.
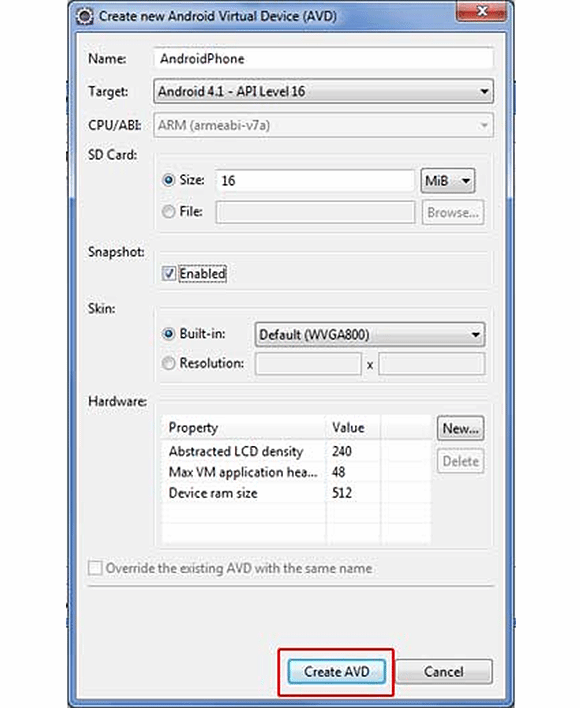
- Establishment of Android Virtual Device
Android Virtual Device is where you will test your Android applications. Follow the below steps to create Android Virtual Device
- Launch Eclipse
- Go to Window > AVD Manager
- Click 'New'
- Give appropriate values and click 'Create AVD'
2. Creating a New Android Application
- Open Eclipse
- Go to File > New > Project
- Choose Android Project from the shown folder
- Click Next
- Fill in the required details i.e. the Project Name, Build Target, Application Name, Package Name, and Create Activity
- Project Name is the name of the folder where Eclipse will save all your project files.
- Build Target is that version of Android SDK which will be used to create your project.
- Application Name is the name you want to give to your underlying application.
- The Package Name is the namespace where all your source code will reside.
- Create Activity is the name of the class stub created by the plugin.
- Click on Finish
3. Drafting the Application Code
The next comes drafting the code for your application. This includes Modifying
- Text.
- Layout.
- java code.
Do it as per the requirements of the underlying application.
4. Running the Application
- Click on the green circle given at the top of the screen.
- Select the AVD generated in the above steps.
- This will make the program get executed successfully.
Hey, you have created your first Android application. Congrats!!
Below is a List of a Few Questions That May Need an Answer
1. What are the primary features of Eclipse software?
The primary features of Eclipse software include a wide collection of useful libraries, a run-time core, an amazing development environment, etc.
2. Which version of Eclipse is the best for Android application development?
Eclipse 3.5 is the best and the most recommended platform for application development.
3. How long does it take to create an Android application?
Although the answer majorly depends on your application needs and features to be included, it takes at least three to four weeks on average to create an enterprise-level Android application.
4. What is the latest version of Android in the market?
The latest version of Android in the market is Android 11.0.
5. How application development can help a business?
A well-planned and easy-to-understand application can help a business in many ways including the following
* It helps a business to reach more number of potential customers.
* It helps a business to enhance its sales.
* It helps a business to generate more profits.
* It helps a business to raise its brand value.
* It helps a business to gain a secure position in the market.
6. Which is the best alternative to Eclipse for Android development?
Android Studio is the best alternative to Eclipse to accomplish Android development.
Conclusion
Most people consider Android as the first priority when it comes to application development and the most recommended IDE to accomplish the task is Eclipse.
The possible reasons are already mentioned in the information given above.
So, if you are also planning to create a mobile application, do think about Android development once.
Contact Indylogix to get the best assistance.
I hope the information was helpful and you enjoyed reading it. Thank you !!
How To Design Android Apps In Eclipse
Source: https://indylogix.com/a-step-by-step-guide-to-android-development-with-eclipse/
Posted by: besterappause1966.blogspot.com
0 Response to "How To Design Android Apps In Eclipse"
Post a Comment